It’s no secret that I’m a big fan of Microsoft’s Team Foundation Server (TFS.) It is a complete tool for managing an application throughout its lifecycle. However I was bought up (and learnt most of my programming skills) on open-source software. It’s important to me that I don’t forget my roots!
While TFS is a fantastic tool for commercial application lifecycle management, SVN (Subversion) also has its place in corporates. It’s free and has lower training overhead: perfect for companies that don’t need anything other than source control (or use other tools.)
Over the last few years, a new kid has burst onto the scene: Git. The popularity of Git has exploded thanks to hosting services such as Github and Bitbucket and its wide adoption in IDEs. It is fast becoming the defacto standard for source control. It supports remote/offline working, better collaboration (pull requests, flexible branching) and is cross-platform.
In this article I’m going to teach you how to migrate an SVN repository (including all its history) into TFS using a Git repository.
You will need:
- Access to TFS 2013 or above, or Visual Studio Online
- Visual Studio 2013 or above
- Git installed on your client machine (the Git command-line tools for Visual Studio work nicely)
- An SVN repository to migrate!
My theory is that Git includes native SVN support. It acts as a bi-directional “bridge” between an SVN repository and a Git repository. TFS 2013+ supports storing code in Git repositories (instead of the previous TFVC format) therefore we can use Git-SVN to import our revisions from SVN and push them as changesets into your Git repository in TFS!
TFS and Visual Studio 2013 were the first server and client versions to support Git. Git is our central point for this operation. It is therefore essential you have TFS and VS 2013 or later.
Once you have the above pre-requisites installed, the process is relatively simple. It can take anywhere from a minute to hours depending on the size of your SVN repository and the number of revisions. The whole process took a couple of minutes on my 44-revision sample repository.
Note: I’m using Visual Studio and TFS 2015, so the screenshots may look slightly different in 2013 and Visual Studio Online.
Step 1 – Create a TFS project with a Git back-end
TFS On-Premises
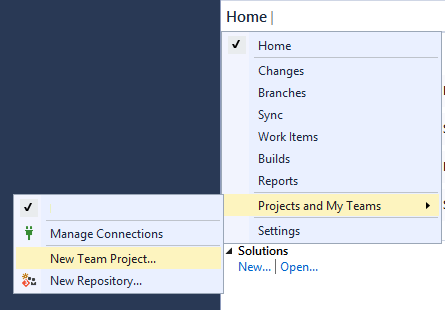
Open Visual Studio and select the “Team Explorer” tab. Connect to your TFS server and click the drop-down menu selector. (It will say something like “Home”, with an arrow on the far right.)
Point to “Projects and My Teams” and click “New Team Project”.
Follow the wizard through selecting the options relevant to you. Ensure you select the “Git” option on the “specify source control settings” page. The default option is pre-selected as “Team Foundation Version Control,” which won’t work.
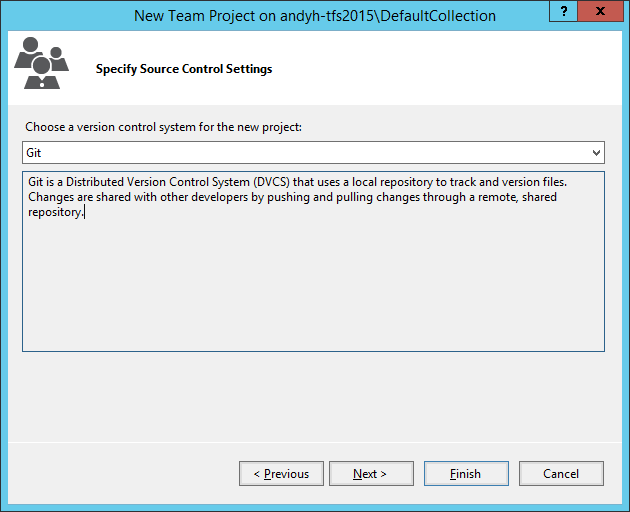
Once you have completed the wizard, hit Finish to create your new project and repository.
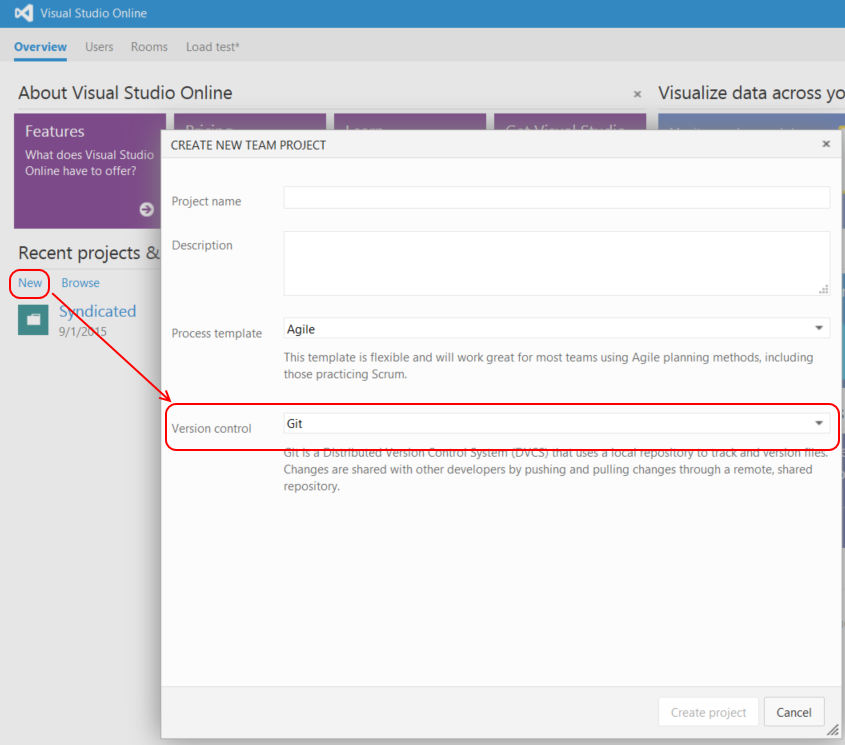
Visual Studio Online
If you are using Visual Studio Online (the cloud-hosted version of TFS) it will look slightly different – the wizard is only a single page.
Click the “New” link under “Projects & Teams” and complete the form. Make sure to select “Git” as your version control system:
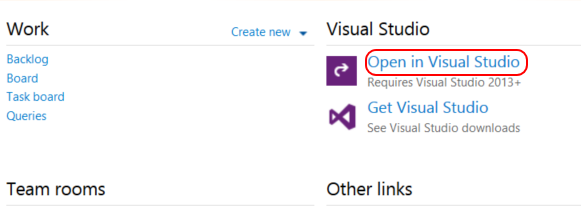
When the wizard has finished, click the “Navigate to Project” button. Click the “Open in Visual Studio” link.
Step 2 – Check out your new project
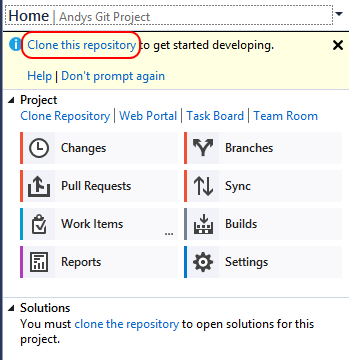
Still within Team Explorer, select the “Clone this repository” link.
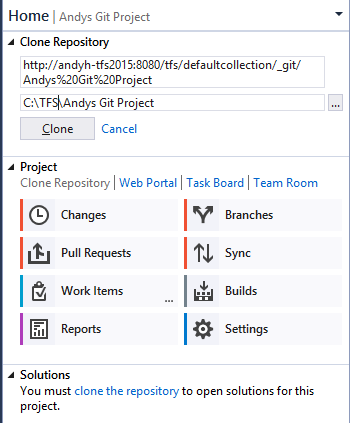
Provide a location in which to store your check-out. Make sure you know where this path is, as you will need it for step 3. Copy and paste it into Notepad if you need to.
Step 3 – Import the revisions from Subversion
The third step is to use Git-SVN to import the revisions from Subversion. There is no UI for this in Visual Studio, so we’ll use the command-line. Don’t worry, it’s straight-forward!
Note: you only need remote access to the SVN repository. You don’t have to check it out to your machine.
Open a command prompt window and change into the directory you noted in step 2.
cd \TFS\Andys Git ProjectNext, we need to “initialise” the link between Git and SVN:
git svn init "[url to your SVN repository]"This sets up the mapping and configuration so subsequent Git-SVN commands know where to find your SVN repository.
Finally – begin the import:
git svn fetchYou should see all your files being transferred across. Git-SVN is effectively replaying your SVN history revision-by-revision. This may take a while depending on how many revisions you have, the size of the changes and the number of files.
At this point, you can now inspect the files that have been migrated in your Git working copy. It’s a good idea to open your solution in Visual Studio and check it builds. Nothing has been committed to TFS yet, so this is an ideal time to make sure everything works.
Note: you can repeat the above command at any time (on the same Git checkout) to pull in newer changesets from SVN. This is perfect to test it out, then you can “switch over” at any point by everyone checking out from (and pushing back into) TFS instead of SVN.
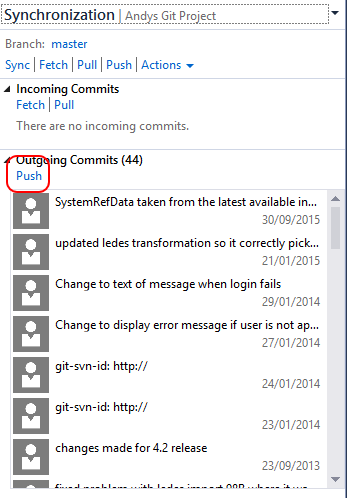
Step 4 – Push to TFS
Now the exciting bit – it’s time to finally get your SVN code (and history) checked in to TFS. This is a standard git operation (push) so it can be performed from the command-line (“git push.”) Alternatively you can use the “Sync” option in Visual Studio.
Note: you will get actual usernames in your history – I’ve removed them from my screenshots for confidentiality.
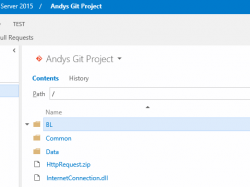
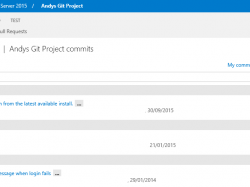
In your TFS web access (http://your-server:8080/tfs) you can browse your source code, see a full history of your commits, and even see differences in any commit we just imported!
| 
| 
|
Add new comment